Cookies

1.28.2019
Peanut Cookies - 5 Ingredients
Salty and sweet peanut balls that crumble and melt into a puddle of peanut butter in your mouth. Like eating peanut butter straight from the jar, the crunchy type. Dangerously moreish and only requires 5 ingredients.
I like the 5 ingredients idea. The theory is that the fewer the ingredients, the easier it is to make. It also means less food waste. And it fits in my minimalist living resolution this year.
Talking about resolutions. One of my resolutions last year was to update this space more often. Well that was a fail. Like my other 10 resolutions. ¯\_(ツ)_/¯ I will try harder this year. In case you haven't noticed, I have given this blog a makeover. It's about time anyway as the old design was starting to look tired. What do you think? Do you like my new blog layout?
If I'm to split this blog into 3 categories, what should it be? I'm thinking maybe based on difficulty levels - easy, challenging, and time consuming?
These peanut cookies fall under the easy category as the food processor does majority of the work.

Peanut Cookies - 5 Ingredients
Makes about 60
200 grams peanuts - see note 1 below
200 grams plain flour
80 grams caster sugar
1/4 teaspoon salt - see note 1 below
6 tablespoons macadamia oil (or peanut oil) - you may require more oil. see note 2 below
Roasted peanuts, halved for each cookie
1 egg, lightly beaten for glazing
To make peanut cookies:
Preheat oven to 170C conventional (or 150C fan-forced). Line a baking tray/sheet with baking paper.
Place peanuts, plain flour, sugar and salt in food processor. Blitz until the peanuts have the same consistency as the flour (about 30 seconds).
Add oil and pulse until it forms a dough. See note 2 below.
Scoop a tablespoon of dough, shape into a ball, and place onto the baking tray/sheet. Repeat until all the dough is used up.
Gently press a peanut half on top of each cookie. Dip your finger into the egg, and lightly dab on each cookie.
Bake for 15 minutes. Allow the cookies to cool completely on the tray. Store in airtight container.
Note 1: Use raw (unsalted and unroasted) peanuts if possible as you can control the amount of salt that goes into the recipe. Salted roasted peanuts can be used in this recipe, just omit the salt in this case. Roast the raw peanuts in a preheated oven at 160C for 5-10 minutes or until golden.
Note 2: If the dough is too dry and not coming together, add more oil, a tablespoon at a time. I needed about 10 tablespoons of oil in total. The dough is ready when you can shape a tablespoon of dough into a ball without it falling apart.


Pineapple tarts are very popular in Singapore during Chinese New Year. They are moreish bitesize cookies with pineapple jam on top. They symbolise prosperity to come and are serve to visitors during Chinese New Year.
Pineapple tarts are my favourite. I like my pineapple jam spiced with cinnamon, cloves and anise. And a buttery shortbread that snaps and crumbles, with that special sandy texture of a shortbread, and a hit of salt at the end. Macadamia is not traditional in pineapple tart, but I like the subtle roasted nutty flavour in my pineapple tarts. The macadamia is my secret touch. Well, I guess, it’s not so secret now.
I use the traditional pineapple tart cookie cutter mould to get the patterns on the cookies. I brought the cookie cutter mould in Singapore many years ago. You can get it online easily these days. You don’t need the special cookie cutter mould though. I tried it with a standard flute cookie cutter, and before you lift the cutter, and with the cookie still in the cutter, make an indentation to hold the jam with a dowel, a rod or even your finger. You won’t get the pretty pattern on the cookie, but it will still look pretty good. Oh, just so that you know, if you try to make the indentation after you remove the cutter, the cookie will most likely crack and break.
I use canned pineapple slices in natural juice. Probably not a traditional thing to do. But I promise you that it will be the same as fresh pineapple and you won't be able to tell the difference.
Pineapple Jam Macadamia Shortbread Cookies (aka Pineapple Tarts)
Makes 50
Pineapple Jam
825 grams canned pineapple slices in natural juice
200 grams caster sugar
1 cinnamon stick
4 cloves
1 anise star
To make pineapple jam:
Pineapple jam is best make a day before assembling.
Drain pineapple slices and discard juice. In a food processor, Pulse pineapple slices to get an even finely grated pulpy texture. This should require only 3 to 5 short one second pulse. The aim is not to get a puree, but a pulp texture.
In a small saucepan, combine pineapple, juice from processing the pineapple, and the remaining ingredients. Place over medium heat and bring to a boil. Reduce heat to gentle simmer, give a quick stir occasionally (every 15 minutes), and when all the liquid has almost evaporated, stir more often (every 5 minutes) so that the jam does not burn. The jam is ready when all the liquid has evaporated. The whole process should take about 1 hour. The jam should be fairly dry but still moist, and golden brown in colour.
Transfer jam to a shallow dish or pyrex container, spread jam out evenly, remove the cinnamon stick, cloves and anise star, cover and refrigerate until completely cool. Jam can be stored for a week before use.
Macadamia Shortbread
125 grams macadamias
300 grams plain flour
90 grains rice flour
1/2 teaspoon salt
250 grams unsalted butter, softened, room temperature
75 grams caster sugar
1 teaspoon vanilla extract
You will also need 1 egg yolk for egg wash. Optional.
To make macadamia shortbread:
Roast macadamias in a preheated oven at 160 degrees celcius fan-forced for 10-15 minutes, or until golden brown. Remember to stir the macadamias once or twice while roasting to ensure all the macadamias are evenly roasted. Allow macadamias to cool completely.
In a food processor, add cooled macadamias and 1/4 cup plain flour, process until macadamias are finely chopped. (Processing the macadamias with flour prevents the macadamias from becoming a paste.)
Transfer the macadamia and flour mixture to a large bowl. Add the remaining plain flour, rice flour and salt to the mixture. Stir to combine and set aside.
Using an electric stand mixer with paddle attachment, beat butter, sugar and vanilla extract until light and fluffy. Stop mixer. Add the macadamia and flour mixture. Using a spatula, mix all the ingredients until just combined. Gather mixture into a ball and wrap in clip film, pat down into a disk, and refrigerate for at least 2 hours or until firm.
Roll out the dough between two sheets of baking paper until 1/4 inch thick. Generously flour the cookie cutter mould and cut out cookies. Place cookies on baking tray. Re-roll remaining dough and repeat. (If the dough becomes too soft and difficult to handle, or if you find that the dough keeps sticking to the mould even after you have floured it, transfer dough in fridge for 10 minutes or until firm.)
To assemble:
Preheat oven at 160 degrees celcius fan-forced.
Roll a teaspoon of the pineapple jam into a ball, and place jam on the cookie, press jam lightly onto the cookie.
If you are using egg wash, brush beaten egg yolk lightly over the cookie and jam. The egg wash is make the cookie and jam glossy and darker in colour.
Bake for 20 minutes. Allow to cool on baking sheet for 5 minutes before removing to a wire rack to cool completely. Store in air-tight container.


These flourless cookies are probably the easiest thing I have ever made. It's one of those mix-everything-in-a-bowl type recipe. These cookies are amazingly good for something that requires so little effort. They are crisp around the edges and chewy in the middle. I love the classic combination of hazelnut and chocolate which always reminds me of nutella. I added a touch of salt in and on these cookies because I believe that the salt brings these cookies to another level. The salt is totally optional though if you are not a fan of sweet and salty.
I can't take credit for this recipe of course. It's a Donna Hay recipe which was featured in a weekend paper (Sunday Times?) a couple of weeks ago. I was curious, and I had all the ingredients in my pantry. I'm glad that I tried it because this recipe is definitely a keeper.

Hazelnut and Chocolate Chips Flourless Cookies
Makes about 12
175grams (1 3/4 cup) hazelnut meal (ground hazelnut)
40grams (1/4 cup) cornflour
110grams (1/2 cup) caster sugar
60grams (1/3 cup) brown sugar
1 teaspoon baking powder
Pinch of salt (about 1/8 teaspoon)
100g unsalted butter, melted and allow to cool slightly
1 egg, lightly beaten
1 teaspoon vanilla extract
150grams dark chocolate chips
Flake sea salt to sprinkle
To make Hazelnut and Chocolate Chips Flourless Cookies:
Preheat oven to 180C conventional (or 160C fan forced).
Place the hazelnut meal, cornflour, caster sugar, brown sugar, baking powder and salt in a large bowl and mix to combine.
Add butter, egg and vanilla extract and mix well to combine.
Stir through the chocolate chips.
Roll 2 tablespoons of dough into a ball. Repeat with remaining dough.
Place the balls on baking tray lined with non-stick baking paper, leaving 8cm between each ball to allow room for spreading.
Bake for 10-12 minutes or until golden brown.
Allow to cool slightly on trays before transferring to wire racks to cool completely. Sprinkle a small amount of flake sea salt over cookies while still warm.

5.14.2013
Matcha (Green Tea) Cookies

I'm sure matcha fans will love these cookies.
There is something about this cookie that makes me want to stop for quarter of a minute (because that is how long it took for me to eat one of these cookies) and enjoy it quietly. The matcha flavour is perfectly subtle, and is neither weak nor overpowering. The cookie is lightly sweetened, and has a shortbread-like crumb that is crisp and yet delicate.
The original recipe suggests coating the cookies with granulated sugar. I prefer without. Instead I decorate each cookie with tiny black sesame seeds, painstakingly, using a tweezers.

Matcha (Green Tea) Cookies
(Adapted from Lovescool)
Makes about 24 numbers of 5cm diameter cookies
64 grams icing sugar
1 1/2 tablespoons matcha powder
140 grams unsalted butter, cut into cubes, softened
240 grams plain flour
3 egg yolks
Black sesame seeds to decorate (optional)
In a medium bowl, whisk together the icing sugar and matcha powder.
With an electric mixer fitted with a paddle attachment, mix the butter and sugar/matcha mixture until pale and creamy.
Add flour and beat until well combined. Add the egg yolks and mix just until the eggs are fully incorporated and a mass forms.
Form dough into a ball, flatten into a disc, cover with plastic wrap and refrigerate until firm (about 30 minutes).
Line a baking tray with baking paper.
Roll dough out between 2 sheets of baking paper to 1cm thick. Cut out dough with a cookie cutter. Place onto prepared trays. Re-roll leftover dough and repeat.
Decorate with black sesame seeds. Freeze cookies for 10 minutes while waiting for oven to heat up.
Preheat the oven to 180 degrees celsius (or 160 degrees celsius fan-forced). Bake cookies for 15 minutes, or until golden. Allow to cool on tray for 2 minutes before transferring to a wire rack to cool completely.


People! You need to lock these cookies away immediately after you bake them! Or you will find yourself coming back for seconds, thirds, fourths… These cookies are THAT good!!!
These are the best cookies, and my favourite, that I have made to-date.
The flaked sea salt gives the cookie an interesting first bite, balance out the sweetness, and makes it moreish. The brown butter adds a beautiful nutty caramel flavour to the cookies. (What is brown butter, you might wonder. It is simply just cooking the butter until hazelnut brown.) The nutella gives a gooey chocolaty centre. The cookie is crispy around the edges and still slightly chewy and soft in the middle. The whole cookie explodes with different flavours and textures. It is out-of-the- world good.
I tried the peanut butter stuffed version of this cookie, and it is equally good. Oh and a tip; don't bake these cookies without freezing the cookie dough first (or at least refrigerate for 2 hours), or they will not bake properly.
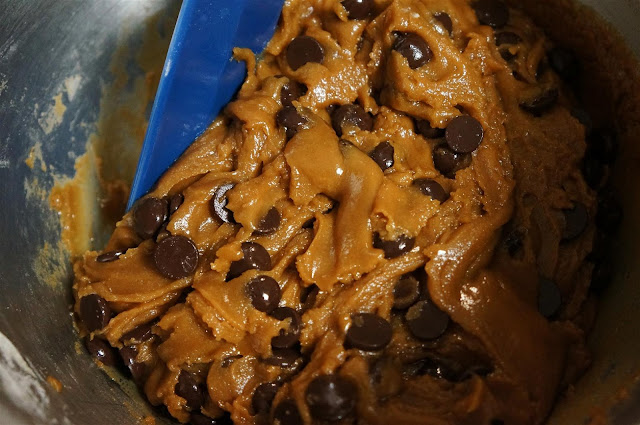


Nutella-Stuffed Brown Butter and Sea Salt Chocolate Chip Cookies
(Adapted from Ambitious Kitchen)
Makes 48 cookies
48 x 1 teaspoon Nutella
225 grams unsalted butter, cut into cubes
275 grams dark brown sugar
50 grams caster sugar
1 egg
1 egg yolk
1 1/2 teaspoons vanilla extract
1 tablespoon plain greek yogurt (or natural yogurt)
280 grams plain flour
1 1/4 teaspoons baking soda
1/4 teaspoon of salt
1 1/2 cup dark chocolate chips
Flaked sea salt for sprinkling
At least 1 hour before making cookies, spoon or pipe about a teaspoon dollop of nutella on baking paper. You will need at least 48 dollops. Freeze nutella until firm.
Put the butter in a small saucepan and bring it to the boil over medium heat, stirring occasionally. Allow the butter to bubble away until it turns a hazelnut brown colour. Keep your eye on it- the difference between brown and black is measured in seconds. Immediately transfer butter to a bowl to prevent burning and set aside to cool slightly (about 10 minutes).
In a medium bowl, whisk together the flour, baking soda and salt.
With an electric mixer, mix the butter, brown sugar and caster sugar until thoroughly blended. Beat in egg, egg yolk, vanilla, and yogurt until combined.
With mixer on low speed, add the flour mixture and beat until just combined. Gently fold in all of the chocolate chips.
Scoop out 1 1/2 tablespoon of dough and roll into a ball. Flattened dough ball very thinly into the palm of your hand. Place a dollop of frozen nutella in the middle and fold dough around it. Gently roll into a ball. Place dough balls on cookie tray. Freeze dough balls for at least 30 minutes. (At this stage, if you do not wish to bake all 48 cookies because you might end up eating it all, you can pop the frozen dough balls in a freezer bag and store in the freezer for up to 3 months. You don’t have to thaw the frozen dough before baking.)
Preheat the oven to 180 degrees celsius (or 160 degrees celsius fan-forced). Place dough balls on baking tray, at least 5cm apart. Bake the cookies until the edges of the cookies begin to turn golden brown (about 15-18 minutes). The cookies will be soft and appear undercook in the middle but they will continue to cook and harden once out of the oven. Cool the cookies on the sheets for at least 2 minutes. Sprinkle with a little sea salt. Transfer cookies to wire rack to cool completely.

4.16.2013
Peanut Butter and Raspberry Jam Macarons

I only very recently stumbled upon the wonderful combination of peanut butter and jam. I had peanut butter, and I had jam, and always separately. It just never appeals to me to put them together. What else have I been missing out all these while?
Inspired by the discovery of this very exciting new (for me anyway) flavour combination, I made peanut butter and raspberry jam macarons. This is now my favourite macaron flavour, so simple and yet so satisfying at 3pm with a hot cup of jasmine tea.
The recipe below is my go-to recipe for making macaron shells. I have posted the same recipe on this blog several times before. However this time, I have arranged the recipe so that it is more “step-by-step” to how I have done it. I have also added tips and notes to the recipe, which I hope will be useful for anyone making macarons for the first time.
I made two batches of macarons (because I enjoy making things difficult for myself); a batch for the pink shells and the other for the brown shells. The recipe below is only for a single batch of colour of your choice.


Peanut Butter and Raspberry Jam Macarons
(Macaron shells recipe adapted from Secrets of Macarons)
For the macaron shells
200 gram almond meal
200 gram icing sugar
75 ml water
200 gram caster sugar
2 x 80 gram egg whites
Pink or/and brown food colouring (optional)
You will also need smooth peanut butter and raspberry jam.
To make macaron shells:
Preferably a week in advance, separate the egg whites from the yolks. Weigh out about 160grams egg whites into a bowl, cover with cling film, and set aside in the fridge. (Note: I recommend adding an extra egg white to the 160grams as the egg whites will lose some of it's weight over time.).
One hour before making macarons, remove egg whites from fridge, remove cling film and allow egg whites to come to room temperature.
Meanwhile, prepare template for the macaron shells. Cut a sheet of baking paper so that it fits inside the baking tray. Draw circles using a glass, a small cup or a plain round pastry cutter measuring 3.5cm-4.5cm in diameter. Stagger the lines and space the circles 2cm about.
Weigh out almond meal and icing sugar separately. Combine almond meal and icing sugar in a bowl. In a processor, process the almond meal and icing sugar mixture until you have a fine powder. Sift the processed almond meal and icing sugar mixture and set aside. (Note: This step is important to get a smooth macaron shell.)
Now you are ready to make some macarons. (Note: If this is the first time you make macarons, it will be helpful to get a family member or a friend to check on the temperature of the sugar syrup while you work on the egg whites.)
In a small saucepan, bring water and caster sugar to boil without stirring. When the temperature of the syrup reaches 105 degrees celsius (you will need a thermometer), start beating 80grams egg whites in an electric stand mixer (#4 on Kitchenaid) to soft peaks.
When the syrup reaches 115 degree celsius, remove the saucepan from heat. (Note: Make sure the temperature of the syrup doesn’t go above 115 degrees celcius. I usually remove the saucepan from the heat at 113-114 degrees celsius.). Increase the speed of the mixer (#6 on Kitchenaid), and pour the syrup in a thin stream into the egg whites. Decrease the speed of the mixer (#4 on Kitchenaid), and continue to beat the meringue until it cools. It will take about 8-10 minutes. The meringue should be glossy and stiff peak form, and bottom of mixing bowl should be cool enough to touch.
In a large bowl, combine the ground almonds and icing sugar mixture, the remaining 80grams unbeaten egg whites, and food colouring to making a smooth almond paste.
Using a spatula, incorporate about a third of the meringue into the almond paste to loosen the mixture a little. Then add the rest of the meringue, continue folding the mixture carefully until glossy and ("magna-like") moves slowly when the bowl is tilted. The batter should resemble slightly runny cake dough.
Fill a piping bag fitted with a plain nozzle (Note: I used an 8mm diameter nozzle). Place template of circles on baking tray and cover it with a sheet of baking paper. Pipe rounds of batter, using the template as a guide. (Note: You will probably need several baking tray. Or alternatively, you can place the template and baking paper directly on the kitchen bench, lift the baking paper with the piped macarons onto the baking tray when ready to bake.)
Allow the macarons to form a crust at room temperature. The batter should not stick to your finger. This may take anything between 30 minutes to 4 hours, depending on the weather.
Preheat the oven to 150 degree celsius (or 140 degree celsius fan force).
Bake in the oven for 14 minutes. My macarons took about 20 minutes. The macarons are cook when they come off from the baking paper easily.
To assemble, pipe peanut butter around the edge of the macaron to form a "border" for the jam. Spoon a small teaspoon of raspberry jam in the centre.
Macarons are best eaten after 24-hour standing time in the fridge to allow the moisture of the filling to flavour the shells slightly and improve the texture. But who can wait that long...

2.04.2013
Assorted Cute Macarons

I made these macarons for my friend’s baby shower. The rabbit is Miffy, and the bear on the right is the teddy bear that Miffy always carries around. We also have a guest star, Rilakkuma, a popular Japanese bear character.
For the filling, I made lemon buttercream to go with Miffy, and salted caramel buttercream to go with both the bears.
The recipe and technique for making these macarons are the same as the panda bear macarons that I made a few months ago. So I will not repost it here. However, I’m thinking about putting up a step-by-step tutorial for making the Rilakkuma macarons depending on the number of interests. Just leave a comment below or send me an email if you are keen.


10.16.2012
Savoury Sables


These savoury sables will be perfect on a cheese platter, maybe with some brie cheese, marinated olives and spicy sweet nuts. Sables is french butter cookie that has a shortbread-like crumb. My version is extremely easy to make, and these sables will be so much more sophisticated than cheese crackers on a cheese platter for sure.
You may notice that I have left the measurement for the parmesan and olives in volume (cups) rather than weight (grams). This is because the amount of these ingredients does not need to be exact, and you can adjust them to your taste.
I’m not a huge fan of rosemary, but these savoury sables do need a touch of herbs. So I added a rosemary leaf to each biscuits, just enough to lightly perfume these biscuits. If you don’t mind rosemary, go ahead and add 1-2 teaspoons finely chopped rosemary into the flour mixture.


Savoury Sables
Makes 24 numbers of 5cm diameter cookies.
200 grams plain flour
1 cup grated parmesan cheese
1/2 cup finely chopped pitted black olives
Black pepper
150 grams unsalted butter
Fresh rosemary to garnish
Sea or rock salt
Cut butter into small (about 5cm) cubes and allow to soften. This step is especially important as the butter needs to be really soft. Cutting the butter into small cubes helps soften the butter quickly and makes it easy to incorporate the butter into the flour mixture later.
Line a baking tray with baking paper.
In a large mixing bowl, combine flour, parmesan, olives and a grinding of black pepper. Knead the butter into the flour mixture with your hands until the ingredients are evenly distributed and a ball of dough has formed. Do not overwork the dough. Shape into a 10cm (diameter) round. Wrap in cling wrap. Refrigerate for at least 2 hours or until firm.
Roll dough out between 2 sheets of baking paper to 4mm thick. Using a 5cm (diameter) fluted cutter, cut out biscuits. Place onto prepared trays. Re-roll leftover dough and repeat.
Sprinkle each biscuit with salt. Lightly press one rosemary leaf on each biscuit. Freeze biscuits for 10 minutes while waiting for oven to heat up.
Heat the oven to 180 degree celsius fan force. Bake biscuits for 15 minutes, or until golden. Allow to cool on trays for 5 minutes before transferring to a wire rack. Store biscuits in an airtight container for up to 4 days.


As if making macarons is not hard enough, I had a crazy idea of making panda bear macarons for a friend’s baby shower.
I’m so happy that these macarons came out beautifully. Aren’t they cute? And for double the cuteness, I packaged the panda bear macarons in equally cute mini Chinese take-away boxes.
With the success of these panda bear macarons, I don’t think I can ever go back to making “normal” macarons again. It would just be too boring.
If you want to attempt these macarons, don’t forget the three big rules- Always aged your egg whites, preferably for 1 week. Process and sift the ground almond (almond meal) and icing sugar. And fold the meringue into the almond paste mixture with care and gentle hand.
UPDATE: If you like these panda bear macarons, you might like these Miffy, Ted and Rilakkuma macarons.

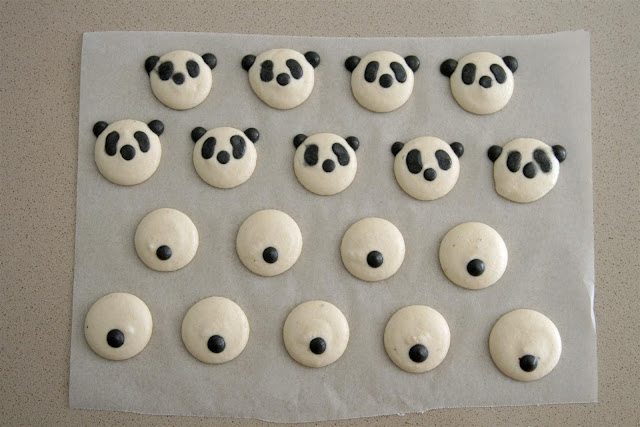


Panda Bear Macarons with Cookie and Cream Buttercream
(Macaron shells recipe adapted from Secrets of Macarons)
For the macaron shells
200 gram ground almonds (almond meal)
200 gram icing sugar
75 ml water
200 gram caster sugar
2 x 80 gram egg whites
For the cookie and cream buttercream
3 egg yolks
60 grams caster sugar
2 tablespoons water
125 grams softened unsalted batter, chopped
60 grams oreo cookies
1/2 vanilla bean, split and seeds scraped
To make macaron shells:
Process then carefully sift the ground almonds and icing sugar. Set aside.
In a saucepan, bring the water and caster sugar to boil. Without stirring, make sure the temperature of the resulting syrup doesn't go above 115 degree Celsius.
Gently beat 80g egg whites to soft peaks, then increasing the speed of the beater when the temperature of the syrup passes 105 degree Celsius. When the syrup reaches 115 degree Celsius, remove the saucepan from the heat and pour the syrup in a thin stream into the beaten egg whites. Continue to beat the meringue for about 10 minutes, so that it cools.
Combine the ground almonds, icing sugar and the remaining 80 grams unbeaten egg whites, making a smooth almond paste.
Using a spatula, incorporate about a third of the meringue into the almond paste to loosen the mixture a little, then add the rest of the meringue, working the batter carefully.
When the batter starts to come together and just before it reaches the "magma-like" consistency, scoop out a quarter of the mixture to a small bowl and set aside. Continue folding the rest of the mixture carefully until glossy and ("magna-like") moves slowly when the bowl is tilted.
Fill a piping bag fitted with an 8mm nozzle with batter. Pipe rounds of batter about 3.5cm in diameter, spacing them 3cm apart on the baking trays lined with baking paper.
Return to the mixture that was set aside earlier. Add black colouring (about a tablespoon) and fold mixture until colour is uniform. The mixture may be runny and appear over-mix by the time the colour is completely incorporated. But that is okay because this part of the mixture is for the ears, eyes, nose and tail, and you don’t need pretty feet for these areas.
Fill a piping bag fitted with an 2mm nozzle with batter. Pipe small dots of batter for the ears, eyes, nose and tail.
Lightly tap the bottom of the trays and allow the macarons to form a crust at room temperature for 2 hours.
Preheat the oven to 150 degree celsius (or 140 degree celsius fan force).
Bake in the oven for 14 minutes. My macarons took about 20 minutes. The macarons are cook when they come off from the baking paper easily.
To make cookie and cream buttercream:
Scrap off creme filling from the Oreos. Crush the Oreos in a food processor until finely ground.
In the bowl of an electric mixer fitted with the whisk attachment, beat the egg yolks and vanilla seeds on high speed for 10 minutes, until pale and creamy.
Place the sugar and water in a small saucepan and bring to boil. Insert a sugar thermometer and simmer until the syrups reaches 121 degree celcius.
With the mixer on medium speed, slowly pour the sugar syrup into the creamed yolks. Beat on high speeds for 10 minutes, until cool. With the mixer on medium speed, add the softened butter a cube at a time, allowing each piece to mix in before adding the next. Beat on high speed for 2 minutes. Add the crush Oreos and beat for another 2 minutes.
To assemble:
Using a piping bag fitted with an 8mm nozzle, full half the macaron shells with ganache then assemble the macarons with the remaining shells. Store the macarons for 24 hours in the fridge.

7.24.2012
Melting Moment with Coffee Cream Icing
This Melting Moment recipe is one of those recipes that I know I can give up the search for a better one because it is just simply the best (in my opinion). The recipe is from one of my top 10 favourite cookbooks, Poh’s Kitchen. I have tried many recipes from this book. All of them came out great, and some of them have actually become my favourite go-to recipes.
This Melting Moment is one of J’s favourites. My mum seems to like it too. I can see why because it is buttery, and just crumbles and melts in your mouth.
I have made a slight change to the recipe. Instead of using the lemon curd filling that is in the original recipe, I made coffee cream icing instead.
Melting Moments with Coffee Cream Icing
(Adapted from Poh's Kitchen)
Shortbread
250 gram unsalted butter, soft
40 gram (1/3 cup) icing sugar, sifted
1 teaspoon vanilla extract
185 gram (1 1/2 cups) plain flour, sifted
65 gram (1/2 cup) cornflour, sifted
Coffee Cream Icing
100 gram butter, soft
120 gram (1 cup) icing sugar mixture, sifted
4 teaspoons instant coffee
2 teaspoon boiling water
To make shortbread:
Heat the oven to 160 degree celcius fan force. Line baking trays with baking paper.
With an electric mixer, cream the butter and sugar until pale and fluffy. Add the vanilla and beat briefly. Stir in the flour, cornflour and salt.


Spoon the mixture into a pipping bag fitted with a flute nozzle and pipe 3cm rosettes onto the prepared tray lined with baking paper. Leave a minimum 3cm space between biscuits. (If you don't have a piping bag, form into walnut-sized balls and arrange on trays. Flatten slightly with a floured fork before baking.)

Bake for 10-15 minutes or until golden. Cool on a wire rack. Handle biscuits gently as they crumble easily.

To make coffee cream icing
Combine coffee and water to form paste. Allow to cool.
In a small bowl, using an electric mixer, beat butter, icing sugar and coffee until pale.


To assemble:
Sandwich biscuits together with coffee cream.


6.06.2012
Black Sesame Macarons
There is always love involved in a box of homemade macarons. How can it not be? All ingredient needs to be measured exactly, each step of making the macarons is as important as the next, and each fold of the batter needs to proceed with care and caution. And let's not forget about the waiting time. It takes 1 week, 1 day and 2 hours of waiting; 1 week for the egg whites to age, minimum 2 hours for the macarons to dry before baking, and 1 day of standing time in the fridge before the macarons are finally ready for consumption. And all these doesn’t even include the making and baking time.
I made these macarons on a beautiful sunny Perth winter day of 25 degrees Celsius and 40% humidity. I consider these macarons a success. These babies have pretty feet, smooth thin shell and a slightly soft chewy inside. Could the success be related to the temperature and humidity of the day as claimed by so some? Maybe yes. Maybe no. Regardless, I thought I should post the temperature and humidity for the baker nerds out there who might find the information important.
I am really excited to share this recipe which I adapted from the book, Secrets of Macarons by Jose Marechal. This is a really good book that provides all the tips, techniques and a little scientific explanation required to make macarons. The macarons in this book uses the italian meringue which, in comparison to the french meringue, involves an additional step of adding sugar syrup at 110-115 degree Celsius to the beaten egg whites.
The italian meringue works well for me. And believe me, I have tried many recipes using the french meringue and failed almost everytime. I did have some success with the macaron recipe from Tartelette which uses the french meringue. My success rate with Tartelett's recipe is about 50/50. I don't always get the pretty feet or sometimes there would be a huge air gap between the shell and cookie interior.
Now, back to these black sesame macarons. I was recently inspired to use black sesame in my baking. The black sesame has a distinctive nutty fragrance but when used in large quantity can be overpowering. So I decided to replace only 25% of the almond meal with ground black sesame. I was quite happy with the favour of the macaron shell. The aroma of the black sesame came through nicely without overpowering.
For the filling, I wanted something that doesn't conflict or overpower the black sesame favour in the macaron. I decided to go safe with the basic vanilla white chocolate ganache. This ganache will be very runny at first. Once cooled to room temperature, the ganache needs to go into the fridge for a couple of hours to set (note: It took 3 hours for my ganache to set). It is ready when it's firm and holds it's shape when piped.
Egg whites need to be prepared several days in advance, preferably a week, so that they lose their elasticity. Weigh out the egg whites and cover the bowl with clingfilm. Set the bowl aside in the fridge. Bring egg whites to room temperature prior to making macarons.
Black Sesame Macarons
(Recipe adapted from Secrets of Macarons)
For the black sesame macaron shells
150 gram ground almonds (almond meal)
50 gram ground black sesame
200 gram icing sugar
75 ml water
200 gram caster sugar
2 x 80 gram egg whites
For the vanilla white chocolate ganache
200 gram whipping cream (do not use low fat cream)
220 gram white chocolate
2 vanilla pods
To make black sesame macaron shells:
Process then carefully sift the ground black sesame, ground almonds and icing sugar. Set aside.
In a saucepan, bring the water and caster sugar to boil. Without stirring, make sure the temperature of the resulting syrup doesn't go above 115 degree Celsius.
Gently beat 80g egg whites to soft peaks, then increasing the speed of the beater when the temperature of the syrup passes 105 degree Celsius. When the syrup reaches 115 degree Celsius, remove the saucepan from the heat and pour the syrup in a thin stream into the beaten egg whites. Continue to beat the meringue for about 10 minutes, so that it cools.
Combine the ground black sesame, ground almonds, icing sugar and the remaining unbeaten egg whites, making a smooth almond paste.
Using a spatula, incorporate about a third of the meringue into the almond paste to loosen the mixture a little, then add the rest of the meringue, working the batter carefully.
Fill a piping bag fitted with an 8mm nozzle with batter. Pipe rounds of batter about 3.5mm in diameter, spacing them 2cm apart on the baking trays lined with baking paper. Lightly tap the bottom of the trays and allow the macarons to form a crust at room temperature for 2 hours.
Preheat the oven to 150 degree Celsius.
Bake in the oven for 14 minutes. My macarons took about 20 minutes. The macarons are cook when they come off from the baking paper easily.


To make vanilla white chocolate ganache:
Split the vanilla pods in two and scrape out the seeds with the blade of a knife. Stir vanilla pods and seeds into the whipping cream. Bring the cream to the boil. Take off the heat, cover and leave to infuse for 30 minutes.
Chopped out the chocolates and melt it in a bowl over a pan of barely simmering water. Remove the vanilla pods from the cream and pour the cream over the melted chocolate a third at a time. Transfer it to a shallow dish to cool at room temperature. Then set aside in the fridge until ganache is firm (about 3 hours).
Ganache can be make the day before.
To assemble:
Using a piping bag fitted with an 8mm nozzle, full half the macaron shells with ganache then assemble the macarons with the remaining shells. Store the macarons for 24 hours in the fridge.

4.19.2012
Jasmine Tea Cookies
This is a delicious buttery and crispy cookie with a hint of jasmine tea scent at the end of each bite.
Because jasmine tea is the star in this recipe, use jasmine tea with a strong fragrance. I used the T2 China Jasmine Tea. Don't be tempted to add vanilla essence as it will overpower the delicate jasmine flavour in the cookie.


Jasmine Tea Cookies (recipe adapted from The Asian Oven)
Ingredient
85g brown sugar
80g unsalted butter
1/4 teaspoon salt
Jasmine tea dust from 3 tea bags
2 tablespoon of beaten egg
125g self-raising flour
1. Beat butter, sugar, salt and tea dust until light and creamy.
2. Add beaten egg and mix until combine.
3. Add flour and mix with a spatula until just combine.
4. Roll dough between 2 sheets of non-stick baking paper to 5mm thick. Chill in freezer until firm, about 15 minutes.
5. Using cookie cutter, cut rounds from the dough, gathering together scraps and rerolling if needed.When dough becomes too sticky to manage, re-chill in freezer until firm.
6. Space cookies on baking tray.
7. Preheat oven to 180C.
8. Baked until golden, about10-15 mins.
9. Remove cookie from the oven. Leave cookie on tray for 1 min before transferring to the rack to cool completely.
Subscribe to:
Posts (Atom)
Social Icons