
)
It's my birthday today. Like last year, and like so many years before, I always feel slightly down on this day. Long gone are the days where I look forward to my birthday with a naive anticipation. If only I can get some of that back. Now, birthday is just a timely reminder that my dreams and goals in life are slipping by, further and further away, and especially this year, I feel lost and disorientated. I wonder if I will be able to get myself out of this downhill spin.
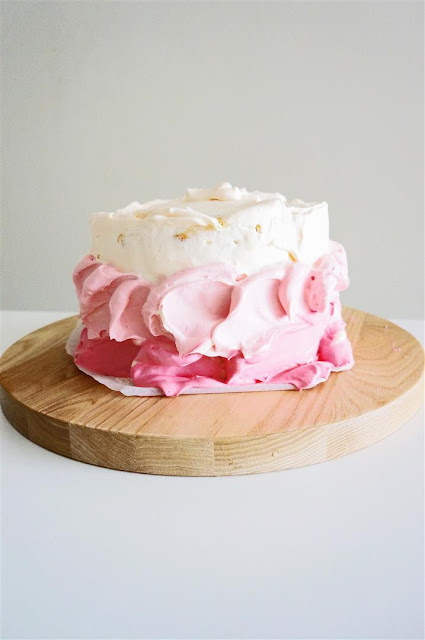
On that depressing note, I baked myself a cake. A genoise cake, with simple strawberry and cream filling, dressed up in pink ombre and accessorised with a pink flower. A girly cake for the girl who used to believe birthday wishes will come true.


Yum. ♥


Ombre Cake (Strawberry and Cream Genoise Cake)
(Genoise adapted from Cookpad)
Makes one 15cm diameter cake
Genoise
(Note: I have baked two cakes to make a taller cake with 4 layers. The quantity below for the genoise is only for 1 cake.)
3 eggs
120 grams caster sugar
105 grams cake flour
15 grams unsalted butter
15 grams vegetable oil
38 grams milk
1 teaspoon vanilla extract
Sugar Syrup
40 ml hot water
20 grams caster sugar
Cream for filling
200 ml thickened cream (35 percent fat), cold
15 grams caster sugar
1 teaspoon vanilla extract
250 grams strawberries, thinly sliced
Ombre icing
300 ml thickened cream (35 percent fat), cold
15 grams caster sugar
pink food colouring
To make Genoise:
Preheat the oven to 170C (or 150C fan-forced). Line a 15cm diameter round cake pan with a removable base with baking paper.
Warm milk and butter in a small saucepan over medium heat until all the butter has melted and the mixture is warm through (around 50C). Add vegetable oil and vanilla extract, whisk to combine. Set aside.
Combine the eggs and sugar in a bowl set over a saucepan of barely simmering water, whisk continously by hand until the egg mixture reaches between 40C to 45C and the sugar is dissolved. (Note: Test by rubbing a small amount between your finger tips. It should feel completely smooth without sugar grains. The egg mixture at this stage does not need to pale and creamy or increase in volume.)
Transfer egg mixture to the bowl of a stand mixer. Whisk at high speed until the egg mixture has cooled and triple in volume. This will take between 5 to 7 minutes. Reduce speed of mixer to low and continue to whisk for 1 minute to breakup large bubbles and smooth the texture.
Add flour around the edge of the bowl, a third at a time, fold until uniform and smooth, taking care not to deflate the mixture too much. (Note: I find that by adding the flour around the edge of the bowl, it does not deflate the mixture as much as sifting the flour directly over the egg mixture.)
Add roughly about a cup of the batter into the butter and milk mixture, and mix well. Then add the mixture back into the batter and fold gently until combine.
Pour batter into prepared baking pan and bake for about 30 minutes. The cake is done when the top is golden brown and springy to the touch.
Immediately turn the cake out of its tin onto a cooling rack. Place a plastic container over the cake. (Note: This helps the cake to retain the moisture). When cake is cooled completely, slice cake horiontally to get 2 layers.
To make sugar syrup:
Dissolve sugar in hot water. Set aside to cool.
To make cream for filling:
Combine cream, sugar and vanilla extract in a clean bowl. Using an electric mixer, whip cream at medium speed until stiff peaks form but cream is still smooth.
To assemble:
Brush sugar syrup on one side of cake layers. Spread cream filling onto cake, then top with sliced strawberries. Press second layer of cake over and press down lightly. Cover cake with a very thin layer of whipped cream. Refridgerate for at least 2 hours before applying ombre icing.
To create ombre icing:
(Video on creating ombre icing here)
Separate the cream and sugar into 3 bowls and tint with food colouring to create 3 different shades of the same colour. Using a electric mixer, whip cream at medium speed until stiff peaks form but cream is still smooth.
Place the cake on an elevated turntable. Make sure it’s chilled with a very thin layer of icing known as a crumb coat.
Using an off-set palette knife, apply a generous amount of the palest icing to the surface of the cake. Smooth out the surface by rotating the turntable and let a small amount of icing creep over the edge. Remember to clean the palette knife by dipping in warm water and wiping clean with a tea towel.
Using a flat palette knife, apply the darkest coloured icing to the side of the cake, taking care to only go a third of the way up. Apply a generous amount as some of this icing will be scraped off later.
Add the final shade of icing between the pale and dark shades.
To create the ombre effect, use the same flat palette knife (taking care to clean it between each application) and line it up with the side of the cake. Tilt the knife at a 45 degree angle and start rotating the turntable. Clean off any excess icing as you go. It’s important to not over-work the icing as it will mix too much and you will lose the three distinct shades.
Happy birthday!!!!
ReplyDeleteHappy Birthday Belle! That cake is so beautiful. No need to be sad..you are very talented and your blog is my favourite, your photography is amazing. Enjoy your day and be glad it's your special one :) E xxx
ReplyDeleteThanks for your kind words, Emma. :) You're too sweet!
DeleteOf course you will! Happy Birthday!!!!
ReplyDelete:) Thanks.
DeleteDe-lurking to say Happy Birthday! No need to be depressed, a birthday is just another number. :)
ReplyDeleteHi Mei. Thanks for dropping by to say hello. I really appreciate it.
Delete***HAPPY*** birthday B. Your cake alone would make me happy. It's so cheerful. BTW: You share the same birthday as my husband, so I guess we were making birthday cakes at the same time... hope that makes you smile.
ReplyDeleteThanks Jen. And yes, that did make me smile.
DeleteWhat a gorgeous cake to celebrate your day. Happy Birthday!
ReplyDeleteHappy birthday! I love this cake, it's so pretty and looks delicious.
ReplyDeleteHappy Belated Birthday, Belle! Your cake is very beautiful. Wish you a happy year ahead!
ReplyDeleteI WANT A SLICE TOO! THE CAKE IS SOOOOO BEAUTIFUL!! SO PERFECT I NEED TO TYPE EVERYTHING IN CAPS. Lol!
ReplyDeleteI literally come back to this post each week to stare at the cake! It's a masterpiece, so beautiful. xx
ReplyDeleteGorgeous cake!
ReplyDeleteHi! This is beautiful, where did you get the rose from?
ReplyDeleteI can't remember where I got the rose from. It's being a while. But it's beautiful, isn't it?
Delete