Tarts

2.06.2018
My Ultimate Flaky Egg Tarts


I think these egg tarts are suffering from an identity crisis.
You see, these are inspired by the Hong Kong style dim sum egg tarts. The pastry is a Chinese style puff pastry, not unlike the French version in terms of technique, but the pastry is slightly easier to manage and more forgiving. Yet we use butter here, like the French, instead of shortening or lard typical in the Chinese style pastry.
The egg custard filling is a Japanese custard pudding, also known as purlin. I shared the recipe here once before.
And these egg tarts look just like the Portuguese custard egg tarts, baked in muffin tins and to golden perfection.
So is it Chinese, French, Japanese or Portuguese? Are you as confused as these egg tarts. No matter. It has everything I seek in an ultimate egg tart. The pastry that shatters into crispy flaky buttery shards. The creamy vanilla egg custard with caramelise patches of Instagram drool worthy perfection. And the perfect egg to pastry ratio.
If you are looking for the recipe to the ultimate flaky egg tarts, look no further, try this. I even add the (almost) step by step photos to give you courage to make these. And for reference, I give you the link to the flaky pastry post from Dreamers Loft where the pastry recipe originates. You are welcome.

My Ultimate Flaky Egg Tarts
(Flaky pastry adapted from Dreamers Loft. Japanese Custard Filling I shared here.)
Makes 6 muffin size tarts
Flaky Pastry
Fat Dough
160 grams unsalted butter, cold, cut into small cubes
100 grams plain flour
Water Dough
60 grams plain flour
20 grams bread flour
5 grams custard powder
10 grams egg (Note: beat 1 egg, measure 10 grams egg, and reserve the remaining egg for the filling)
40 grams cold water
Filing
350 grams milk
1 vanilla pod, halved and seeds scraped
1 whole egg (or remaining egg from the water dough)
2 egg yolks
50 grams caster sugar
To make fat dough component of the flaky pastry:
Place butter and plain flour in a food processor and pulse until the mixture resembles fine crumbs.

Pour mixture on a cling film, working quickly with your hands, gently squash/press the mixture together to form a dough, wrap dough with cling film, and quickly shape dough to roughly 10cm x 12cm rectangle. Refrigerate for at least 30 minutes. On a hot day, you might need to refrigerate the dough for longer until dough is firm.

To make water dough component of the flaky pastry:
Combine plain flour, bread flour and custard powder in a large bowl. Combine egg and water in a small bowl, add to flour mixture, mix until a rough dough forms. Turn dough on a lightly flour-dusted surface and knead dough until smooth, about 3-5minutes. Wrap dough with cling film and refrigerate for at least 30 minutes. (Oh, if you notice that the water dough is smaller than the fat dough and you wonder if that is right since the water dough is suppose to be outer layer. Yes. Yes, it is correct.)

Now the fun part. To make flaky pastry:
On a flour-dusted surface, with a rolling pin, roll the water dough slightly three times larger than the fat dough, about 30cm x 16cm rectangle.

Place the fat dough in the centre on top of the water dough.

Fold over the water dough to wrap and enclose the fat dough. Press all seams to seal.

With a rolling pin, gently and evenly roll out the parcel into a 30cm x 20cm rectangle. Lightly dust with flour as required to ensure the pastry does not stick to the rolling pin or the work surface.

Fold one third left.

And then one third over it. Note that you will get 3 layers. Wrap pastry in cling film, refrigerate for at least 30 minutes and until firm.

Repeat the above folding one more time - Roll out pastry into 30cm long and 20cm wide. Don't forget to lightly dust with flour as required. Repeat one third fold left and one third over it as above. Wrap pastry in cling film, refrigerate for at least 30 minutes and until firm.
Now the final turn. Roll out pastry into 34cm long and 20cm wide.

Fold one quarter left to centre of pastry, and the other quarter right.

Fold pastry in half like a book. Note that you will get 4 layers for this last turn. Wrap pastry in cling film, refrigerate for at least 30 minutes or until firm.

Roll out pastry into roughly 1/4 inch thick and 30cm x 30cm, big enough for 6 nos 10cm circles to line the muffin tins.

Cut out circles with cookie cutter and line the pastry in the muffin tins. Refrigerate until ready to use.

Meanwhile make filling:
Place milk, vanilla seeds and pod in a saucepan over medium heat. Cook, stirring, for 6 to 8 minutes or until it just comes to the boil (small bubbles will form at edge of pan). Remove from heat. Remove vanilla pod.
Place the egg, egg yolks and sugar in a bowl and whisk until well combined. Gradually add the hot milk mixture, whisking to combine. Strain the mixture through a fine sieve into a pouring jug. Refrigerate and allow to cool completely.
To bake:
Preheat oven to 180 degree celcius fan-forced.
Pour cooled filling in prepared pastry cases. And baked for 30 minutes or until pastry is golden and caramelise patches appear on the custard. Serve while still warm.


1.15.2018
Cloud-like Chocolate Fluff Tart


The chocolate filling for this tart is so light, airy and delicate that it disappears in my mouth like a puff of air! I could accidentally inhale the whole thing. I was never a huge fan of chocolate tarts, but this chocolate tart simply blows my mind!
I followed the original recipe with just a couple of minor modifications. I added a pinch of salt to the pastry because I like a little salt in my chocolate. I also changed the technique for making the pastry slightly.
The original recipe suggests to "push (the pastry mixture) into the tin with fingers and knuckles, just as one does for the crumb crust of a cheesecake". This didn't work for me because I couldn't seems to get a thin even layer. So instead, I rolled out the pastry and lined the pastry into the tin. The pastry is a little crumbly, so it broke up in a few places, which is fine as it can be easily patched up by pressing the broken up pieces back. Also I freeze the pastry overnight before baking as it really helps with reducing shrinkage. And I pricked the base all over with a fork just so that the pastry doesn't puff up when it bakes.
A few tips making this pastry. First, butter the tin even if it's non-stick. This pastry will stick to the tin as I learned the hard way. Second, don't bother with blind-baking because the pastry will stick to the baking paper. Again, I learned this the hard way. Lastly, don't remove the pastry from the tin until the filling is set. This pastry is quite delicate and crumbly, and the filling helps to hold the pastry together.
I have altered the recipe to the way I made the tart, but feel free to refer to the original recipe.

Cloud-like Chocolate Fluff Tart
(Adapted from The Cook's Table by Stephanie Alexander)
Makes 23cm tart
Chocolate Pastry
125 grams unsalted butter, softened at room temperature, plus extra for buttering
80 grams caster sugar
150 grams plain flour
50 grams good-quality dutch cocoa powder
1/4 teaspoon salt
Chocolate Fluff
3 gold strength gelatine sheets (2 grams per sheet)
120 grams dark chocolate (70% cocoa)
80 ml (1/3 cup) strong espresso coffee
3 free-range eggs, separated, room temperature (use the freshest eggs you can get)
80 grams caster sugar
1 teaspoon pure vanilla extract
Optional: You will also need unsweetened whipped cream and strawberries to serve.
To make Chocolate Pastry:
Butter a 23 cm tart tin lightly.
Using an electric mixer with paddle attachment, cream the butter and caster sugar until very pale. Stop the motor. Combine flour, cocoa powder and salt in a separate bowl, then sift the flour mixture into the butter mixture. Using a spatula, incorporate the flour mixture into the butter mixture until well combined and starts to form into a dough.
Wrap pastry with plastic wrap, flatten into a disc, and refrigerate for 30 minutes.
Roll out the pastry between two sheets of baking paper until 1/4 inch thick. If the pastry becomes too soft and difficult to handle, put pastry in freezer for 5 minutes until firm but pliable. Lift pastry into tin, ease into base and side. Trim off any excess pastry. Prick the base all over with a fork. Freeze the pastry overnight.
When ready to bake the pastry, preheat oven to 180 degree celcius fan-forced. Bake the pastry (from frozen) for 20 minutes. Let cool completely in tin.
To make Chocolate Fluff:
Soak the gelatine leaves in a bowl of cold water.
Meanwhile, combine the chocolate and coffee in a heatproof bowl that fits snugly over a saucepan of simmering water, making sure the base of the bowl does not touch the water, then stir from time to time until the chocolate has melted and the mixture is smooth.
Remove the bowl from the pan and set aside, then tip out almost all of the hot water, leaving just 2 tablespoons in the pan. Squeeze the gelatine leaves and drop them into the water left in the pan, then stir to dissolve. Pour into the chocolate mixture and stir well.
Using an electric mixer or hand-held electric beaters, beat the egg yolks, half of the caster sugar and the vanilla until thick and pale.
Fold the egg yolk mixture in the chocolate mixture, ensuring that it is all well mixed together. Refrigerate to chill for 15 minutes, whisking once or twice, until the mixture reaches room temperature.
Wash the bowl and beaters and dry very thoroughly.
Using the electric mixer, beat the egg whites until soft peaks form. Gradually beat in the remaining sugar until you have a glossy meringue. Fold into the chocolate mixture and pour into the chocolate pastry case.
Refrigerate to set for at least 4 hours. Carefully remove tart from tin, and decorate with the whipping cream and strawberries to serve if desired.

3.18.2017
Matcha Black Sesame Tarts

Oh, hello there! It has been way too long since I last shared a recipe here. I haven't abandon this blog. I just haven't been baking as much lately. In fact, these Matcha Black Sesame Tarts are the second thing I baked this year. (The first was Afghans Cookies which will be a post for another day.)
Anyway, these tarts are soooooo good that I decided to come out from my hiatus so to share this recipe ASAP. It's that good!
I love the addition of the black sesame seeds in the sweet pastry case. The unmistakably nutty sesame flavour in the pastry case adds an almost savory-like element to the tarts, not overpowering as sesame seeds can be sometimes, but rather a gentle note that has a somewhat lingering familiarity.
Matcha is the star of the show of course. For anyone who is concerned about the bitterness, typical of Matcha, these tarts carry the flavour but not the bitterness. And the pretty jade green pastry cream makes the tarts seem deceptively healthy. Green means healthy, right?
I'm so excited to finally use the elderflowers from my garden. I planted the elderflowers last winter with hope that I will be able to use them to decorate my desserts. The elderflowers exceed beyond expectation, with constant blooms since spring. Ahhh, the joy of gardening.

Matcha Black Sesame Tarts
(Adapted from Delicious Magazine)
Makes 6x6cm tartlets
Black Sesame Sweet Pastry Case
125 grams unsalted butter, chilled, chopped
2 tablespoons caster sugar
1/4 teaspoon salt
200 grams plain flour
2 tablespoons black sesame seeds
60ml cold water
Matcha Pastry Cream
375ml pure (thin) cream
5 egg yolks
50 grams caster sugar
2 tablespoons matcha powder
125ml double cream
You will also need fresh strawberries (and elderflowers to decorate).
To make black sesame sweet pastry case:
Place butter, sugar, salt, flour and sesame seeds in a food processor and process until the mixture resembles fine crumbs. Add water and process until the dough just comes together. Turn out the pastry, flatten into a disc, wrap with plastic wrap and refrigerate for 30 minutes.
Roll out the pastry between two sheets of baking paper until 1/4 inch thick. Cut rounds large enough to fit the tart tins. Lift pastry into tin, ease into base and side. Trim off any excess pastry. Prick the base all over with a fork. Refrigerate for at least 30 minutes. (I like to freeze the pastry overnight. I find that baking the pastry from when it’s completely frozen helps minimize shrinkage.)
Preheat the oven to 180 degree celcius fan-forced. Place tart tins on baking tray. Line the pastry with a sheet of baking paper and pour in dried beans or rice. Bake for 15 minutes. Remove paper and beans/rice. Return to the oven for another 10 minutes, or until light golden. Set aside to cool completely.
To make Matcha Pastry Cream:
Place the cream in a saucepan over high heat and bring to just below boiling point. Place egg yolks, sugar and matcha in a heatproof bowl and whisk until creamy. While whisking, slowly pour the hot cream over the matcha mixture.
Set the bowl over a saucepan of simmering water (don’t let the bowl touch the water) and stir custard with a wooden spoon for 4-6 minutes until mixture coats the back of the spoon.
Cover surface with plastic wrap and chill for 2 hours or until cold. Transfer to a stand mixer, add double cream and whisk until soft peaks form.
To assemble the tart, spoon the matcha cream into the tart shells and top with the strawberries (and elderflowers).

6.12.2016
Fancy "Green Apple" Apple Tart


I had this idea of making an apple tart that actually looks like an apple for a while now. Well, I can't take all the credit. The idea was inspired by a couple of patisseries that did that, and I thought it's probably something I can recreate quite easily at home. So there you go! Not bad at all, if I may say so myself. Haha.
The hardest part of making this tart is the pâte sucrée. I did a post on making pâte sucrée last week. The other components for this tart are pretty easy, I promise.
The dome part of this tart is an apple vanilla bavarian cream. Bavarian cream is like a custard based mousse. Hidden under the dome is homemade vanilla apple compote.
I'm really happy with the glazing. Look how shiny it is! I could almost see my reflection. A note about the glazing - you will need several coats to achieve the glaze. Just pour the glaze that is collected at the bottom of the baking tray back into the jug, pour over the domes again, keep repeating. You will probably need to do this about 10 times.


Fancy "Green Apple" Apple Tart
Makes 6 tarts
Pâte Sucrée
See link here.
Bake the pâte sucrée on the day when you are ready to assemble the tart. I used 8cm diameter tart rings.
Apple Puree
250 grams granny smith apples (about 3-4 apples, see notes below)
25 grams caster sugar
25 grams water
To make apple puree:
Note: Weigh out 250 grams of apples after peeled, cored and cut into 2cm cubes.
Combined apples, sugar and water in a saucepan over medium heat. Cook until apples are very soft, about 15 minutes. Transfer to food processor and puree. Makes about 1/2 cup apple puree.
Apple Bavarian Cream
2 sheets gelatin
2 egg yolks
50 grams caster sugar
1 vanilla bean, halved and seeds scraped
1/2 cup apple puree (see steps above), room temperature
200ml whipping cream
To make apple bavarian cream:
Soften the gelatin in a bowl of cold water.
Whisk egg yolks, sugar and vanilla seeds in a heatproof bowl until pale and creamy. Add apple puree, and whisk to incorporate. Place bowl over a saucepan of gently simmering water, whisk constantly, until the mixture reaches 85C. Remove from heat.
Squeeze the excess water from the gelatin. Stir gelatin into the apple mixture until gelatin completely dissolves. Strain the mixture through a sieve into a bowl. Place the mixture over a bowl of water with ice. Stir mixture until it cools to room temperature. (Alternatively, place cling wrap over surface of mixture, and place in freezer for about 5-10 minutes until it cools to room temperature.)
Meanwhile, whisk cream to firm peaks (be careful not to over-whip). When the apple mixture cools completely, carefully fold whipped cream into the apple mixture with a spatula until combine.
Spoon the apple bavarian cream in the cavities of 70mm diameter semi-sphere silicon mold. Wrap the mold well with plastic wrap, and freeze until completely frozen.
Apple Compote
1 sheet gelatin
250 grams granny smith apples (about 3-4 apples, see notes below)
25 grams caster sugar
25 grams water
1 vanilla bean, halved and seeds scraped
To make apple compote:
Note: Weigh out 250 grams of apples after peeled, cored and cut into 2cm cubes.
Soften the gelatin in a bowl of cold water.
Combined apples, sugar, water and vanilla pod and seeds in a saucepan over medium heat. Cook until apples soften slightly, about 5 minutes. The apples should lose the crunch, but still firm and not mushy. Remove vanilla pod.
Squeeze the excess water from the gelatin. Stir gelatin into the apple mixture until gelatin completely dissolves. Refrigerate for at least 4 hours.
Glaze
4 sheets gelatin
250ml water
250 grams caster sugar
A couple drops of green food coloring
To make glaze:
Soften the gelatin in a bowl of cold water.
Combined water and sugar in a saucepan over medium heat, stir until sugar dissolves, and allow to bring to a boil for 5 minutes.
Squeeze the excess water from the gelatin. Stir gelatin into the sugar syrup. Add food colouring and stir to combine. Pour glaze into a jug and set aside to cool to room temperature (20ish degree celsius) before use.
To assemble:
Spoon apple compote into baked tart case. Set aside.
Unmold the apple bavarian cream domes, and place on cooling rack set on a baking tray. Pour room temperature glaze over the domes. Note about the glaze- the first pour/coat of glaze will seems like it's not sticking to the dome. You will need to pour the glaze over the dome a few more times, letting each coat to set for half a minute before the next pour.
Carefully place the dome over the tart case. Stick a pretzel stick on top of the dome.
Allow to thaw tart before serving. (Note: Takes about 20 minutes to thaw at room temperature depending on the weather. Or 2-4 hours to thaw in the fridge.)


Autumn is well and truly here. Last weekend, we swapped our summer duvet for a winter one; heavier and fluffier doona that showered our bedroom with feathers when we fluffed it out. For me, it’s not autumn until we change the duvet, and I can’t help but feel quietly excited about the colder months ahead. The truth is that I like the cold even when I complain about being cold all the time.
There are many reasons to love the colder months. Comfort food, for one, like warm soups, slow-cooked stews, hearty pies and crowd pleaser quiches. And it so happen that the best time to make pastries is when it's cold.
Let’s talk about this sour cream shortcrust. One word. WOW!
I have my go-to shortcrust that I seldom deviate from when I make quiches. However, I was curious about the Maggie Beer’s sour cream shortcrust and decided to test it out on the weekend. As you can probably tell, I was bowled over. The sour cream shortcrust is rich, buttery, crisp, and melt-in-the-mouth, like any good shortcrust pastry. But on top of it all, it is flaky too. This sour cream shortcrust is like a cross between shortcrust and puff pastry. Could it be the sour cream or my awesome pastry making skill? I would like to think it’s the latter, but it’s probably the sour cream.
For the filling, I like the smoked salmon and kale in big chunks and just enough egg and cream to hold everything together. So, you know, to make it healthier. Some might prefer it with more egg and cream, and lesser and smaller pieces of salmon and kale. I will leave that decision to you.
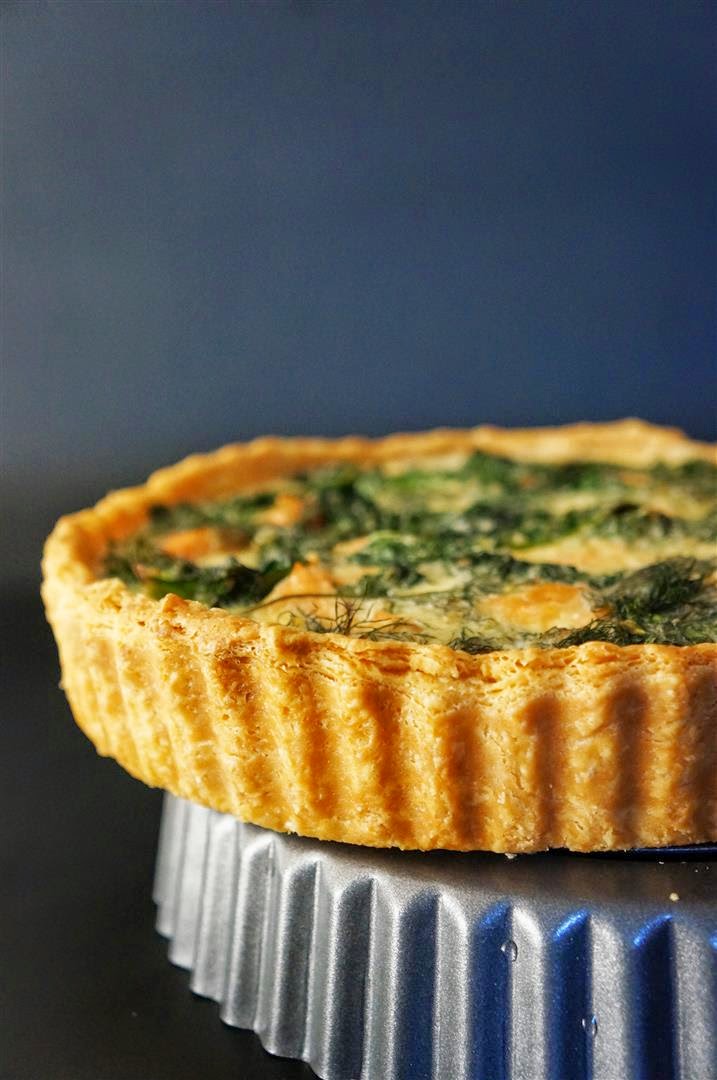

Smoked Salmon, Kale and Dill Quiche with Sour Cream Shortcrust
(Sour cream shortcrust adapted from Maggie Beer)
Makes one 20cm tart
Sour Cream Shortcrust
250 grams plain flour
200 grams unsalted butter, cold, cut into small cubes
125 ml sour cream
Filling
1 bunch of kale
1 tablespoon olive oil
1 garlic cloves, crushed
100 grams smoked salmon, flaked into small pieces using a fork
1 bunch fresh dill, roughly chopped
3 eggs
80 ml single (pouring) cream
60 ml milk
40 grams finely grated parmesan
Sea salt and cracked black pepper to taste
To make sour cream shortcrust:
Place butter and flour in a food processor and pulse until the mixture resembles fine crumbs. Add the sour cream and continue to pulse until the dough starts to incorporate into a ball. Flatten the dough into a disc, wrap dough in plastic wrap and refrigerate for 30 minutes or until firm.
Roll out the pastry between two sheets of baking paper to 3mm thick and large enough to line 20cm round loose-based tart tin. Lift pastry into tin, ease into base and side. Trim off any excess pastry. Refrigerate 30 minutes or until firm. (I usually like to cover the pastry with plastic wrap and freeze it overnight. I find that baking the pastry when it’s completely frozen helps minimize shrinkage.)
Preheat the oven to 200C (or 180C fan-forced). Place tart tin on baking tray. Line the pastry with a sheet of baking paper and pour in dried beans or rice. Bake for 20 minutes or until light golden. Remove paper and beans/rice. Return to the oven for another 10-15 minutes to crisp. Allow to cool while we work on the filling.
To make filling:
Reduce the oven to 180C (or 160C fan-forced).
Remove and discard stem from kale. Tear or roughly chop kale leaves into small bite-size pieces.
Heat oil in a frying pan, add garlic and stir over medium heat until fragrant. Add kale leaves and saute until the kale has wilted. Remove from heat.
Place eggs, cream, milk, cheese, salt and pepper in a bowl and whisk to combine.
Evenly distribute kale, smoke salmon and dill in pastry shell and pour over egg mixture. Bake for 25-30 minutes or until set and golden. Rest for 10 minutes before serving.


Can someone please tell me how to safely remove the tart from the still-very-hot tart tin, while wearing clumsy oven gloves, without burning oneself, and catching the falling tart no matter how careful one might be without breaking the tart shell in all different places? Gawh!!! Impossible!
Here’s a tart that is different from the usual lemon tart, just as delicious, with the refreshing tropical flavour of the passionfruit. Is it worth burning my arm for? Grudgingly yes, but it would have been better if I didn't.
I used canned passionfruit pulp. Trust me, it's just as good as the fresh stuff.
To get the smooth creamy filling, it’s important not to overcook the filling. The filling should feel firm around the outside of the tart, but still a bit wobbly in the middle. The middle will set as the tart cools.
This tart is best make a day ahead. Keep the tart in the fridge and top with the orange mascarpone cream just before serving.


Passionfruit Tart with Orange Mascarpone Cream
(Adapted from The Australian Women's Weekly Magazine July 2013)
Makes one 24cm tart.
Pastry
185 grams plain flour
55 grams icing sugar
30 grams ground almonds
125 grams unsalted butter, chilled and cubed
1 egg yolk (about 38 grams), lightly beaten
1 teaspoon vanilla extract
Passionfruit Filling
160ml passionfruit pulp
300ml cream
110 grams caster sugar
4 eggs
Orange Mascarpone Cream
250 grams mascarpone
60ml double cream
2 tablespoons icing sugar
2 tablespoons finely grated orange rind
60ml passionfruit pulp
To make the pastry:
Place flour, icing sugar, almond meal and butter in a food processor and process until the mixture resembles fine crumbs. Add the egg yolk and process until the dough just comes together. Knead gently and briefly on a lightly floured surface until the dough is smooth. Form into a ball, flatten into a disc, cover with plastic wrap and refrigerate for 30 minutes.
Roll out the pastry between two sheets of baking paper until large enough to line 24cm round loose-based tart tin. Lift pastry into tin, ease into base and side. Trim off any excess pastry. Refrigerate 30 minutes. (At this stage, I usually like to cover the pastry with plastic wrap and freeze it overnight. I find that baking the pastry when it’s completely frozen helps minimize shrinkage.)
Preheat the oven to 180 degree celcius fan-forced. Place tart tin on baking tray. Line the pastry with a sheet of baking paper and pour in dried beans or rice. Bake for 20 minutes. Remove paper and beans/rice. Lightly brush the pastry shell with egg white to seal. Return to the oven for another 10-15 minutes, or until light golden. Set aside to cool. Reduce the oven to 140 degree celcius fan-forced.
To make the passionfruit filling:
Strain the passionfruit pulp, and discard seeds. Whisk the strained passionfruit juice, cream, sugar and eggs together in a medium bowl until combined. Carefully pour the filling into the pastry shell and bake for 35-45 minutes, or until just set. (Important: Don’t overcook the filling. The custard should feel firm around the outside of the tart, but still a bit wobbly in the middle.)
Leave to cool slightly, when the pastry seems firm enough, remove the tart from the tin. Allow the tart to cool completely on cooling rack. Then refrigerate for at least 3 hours, preferably overnight.
To make the orange mascarpone cream:
Combine mascarpone, double cream, icing sugar and orange rind in a small bowl.
Serve tart topped with orange mascarpone cream and drizzle with passionfruit pulp.

8.20.2013
Salted Chocolate Caramel Tart

I reckon it’s time for a rich decadent chocolate dessert. This salted chocolate caramel tart is rather quite special: the interesting contrast of sweet and salty, the smooth bittersweet dark chocolate ganache, the gooey caramel, and the crumbly buttery chocolate crust. Imagine popping one of these in your mouth. So good!
The recipe below is for one large tart. But I made 36 tiny ones instead, using cookie cutter to cut rounds to line the holes of a mini muffin pan. I have added additional steps to the recipe below which are not mention in the original recipe, such as resting the pastry and blind baking the tart shell to reduce shrinkage. I have also allowed the caramel to cool down slightly before pouring it into the tart shell as a precautionary step to avoid soggy bottom. Nobody likes shrinkage and soggy bottom (heh heh). Decorating the tartlets with roasted hazelnuts is totally optional but a generous sprinkle of flaked sea salt is a must.


Salted Chocolate Caramel Tart
(Adapted from Brooklyn's Marlow & Sons via Saveur)
Makes one 22cm diameter tart or 36 tiny ones
Note: Measuring cups and spoons below are based on American measurements
Chocolate Crust
190 grams (1 1/2 cups) plain flour
25 grams (1/4 cup plus 1 tablespoon) dutch-process unsweetened cocoa powder
1/4 teaspoon salt
140 grams (10 tablespoons) unsalted butter, cubed and softened
60 grams (1/2 cup) icing sugar
2 egg yolks, at room temperature
1/2 teaspoon vanilla extract
Caramel
300 grams (1 1/2 cups) caster sugar
3 tablespoon light corn syrup
1/4 teaspoon kosher salt
6 tablespoons water
85 grams (6 tablespoons) unsalted butter
6 tablespoons heavy cream
1 tablespoon creme fraiche
Ganache
1/2 cup heavy cream
115 grams (4 ounces) bittersweet chocolate, finely chopped
Sea salt for garnish
To make chocolate crust:
Combine flour, cocoa powder and salt in a medium bowl and set aside. Use an electric mixer with paddle attachment, beat the butter and sugar until pale and creamy. Mix in yolks and vanilla extract, and continue to beat until fully combined. Add in dry ingredients, and beat on low speed until just combined. Form dough into a ball, flatten into a disc, cover with plastic wrap and refrigerate for 30 minutes.
Roll out the pastry between two sheets of baking paper until large enough to line tart tin. Lift pastry into tin, ease into base and side. Trim off any excess pastry. Refrigerate 30 minutes. (At this stage, I usually like to cover the pastry with plastic wrap and freeze it overnight. I find that baking the pastry when it’s completely frozen helps minimize shrinkage.)
Preheat the oven to 200 degree celcius (or 180 degree celcius fan-forced). Place tart tin on baking tray. Line the pastry with a sheet of baking paper and pour in dried beans or rice. Bake for 20 minutes until cook through. Remove paper and beans/rice. Return to the oven for another 5 minutes to crisp. Transfer to a rack and allow to cool completely.
To make the caramel:
In a small saucepan, whisk together sugar, corn syrup, salt, and water and bring to a boil. Cook, without stirring, until a candy thermometer inserted into the syrup reads 170 degrees celcius (I didn't bother with the thermometer. I removed the pan from the heat once the sugar syrup becomes a medium amber colour). Remove pan from heat and carefully add in butter, cream, and crème fraîche (the mixture will bubble up). Whisk mixture until smooth. Allow caramel to cool slightly, about 10 minutes. Pour caramel into cooled tart shell and refrigerate until firm, 4–5 hours.
To make the ganache:
Bring cream to a boil. Put chocolate into a medium bowl and pour in hot cream; let sit for 1 minute, then stir slowly with a rubber spatula until smooth. Pour ganache evenly over tart and refrigerate until set, 4–5 hours. Sprinkle tart with sea salt, slice, and serve chilled.

3.05.2013
Classic Quiche Lorraine

As much as I enjoy watching Masterchef, I hate it when the contestants start to get all teary eyes and trembling lips when they serve up a dish that could possibility see them to the elimination door. And when the producers of the show think that there are not enough tears or drama for the week, they will get the judges to ask silly questions like “Why are you here”. That will definitely get one or two tears rolling complete with a sad life story of sort. This never fails to give me a knee-jerk reflex to channel surf. If I want drama, back stabbing, bitching, complete emotional melt down and racism, I could have watch My Kitchen Rules (which is a stupid program that I accidently watch when I have one of my knee-jerk reflex moments).
Fortunately, 80% of the time, Masterchef is about creating mouth-watering beautiful food. I admire that the contestants seem to have the ability to remember 1001 recipes (which must be one of the secret entry requirements) and working under impossible stressful conditions.
By the way, my new favourite celebrity chef is Marco Pierre White. Jamie Oliver will now, unfortunately, take second place.
In case you are wondering, there is a reason for my rant about Masterchef. Because this classic quiche lorraine is a Masterchef 2012 recipe by Gary Mehigan. I was hesitant to try this recipe at first because the Masterchef website is notorious for posting incomplete recipes or recipes that simply doesn’t work.
In the end, I’m glad that I did try out the recipe because this quiche lorraine is the BEST ever (in my humble opinion)! The short crust pastry is buttery and flaky. The bacon, leek and gruyere filling is creamy and flavoursome. I have made this many times because it is one of J’s favourites. Try it, and you will know what I'm talking about...


Classic Quiche Lorraine
(Adapted from Masterchef)
Makes one 20cm tart
Short Crust Pastry
125 grams unsalted butter, chilled and cubed
240 grams plain flour
Pinch salt
1 egg, lightly beaten
1 teaspoon lemon juice
Filling
2 tablespoons olive oil
1 small white onion, finely diced
2 leeks, washed and thinly sliced
3 cloves garlic, minced
150 grams bacon, cut into fine lardons
300ml pure cream
3 eggs
2 egg yolks
1/2 cup grated gruyere cheese
Salt and pepper to taste
To make short crust pastry:
Place butter, flour and salt in a food processor and process until the mixture resembles fine crumbs. Add the egg and lemon juice and process until the dough just comes together. Knead gently and briefly on a lightly floured surface until the dough is smooth. Do not overwork. Form into a ball, flatten into a disc, cover with plastic wrap and refrigerate for 30 minutes.
Roll out the pastry between two sheets of baking paper until large enough to line 20cm round loose-based tart tin. Lift pastry into tin, ease into base and side. Trim off any excess pastry. Refrigerate 30 minutes.
Preheat the oven to 200 degree celcius (or 180 degree celcius fan-forced). Place tart tin on baking tray. Line the pastry with a sheet of baking paper and pour in dried beans or rice. Bake for 20 minutes or until light golden. Remove paper and beans/rice. Lightly brush the pastry shell with egg white to seal. Return to the oven for another 5 minutes to crisp.
To make filling:
Add 1 tablespoon oil in a large frying pan over a medium high heat. Add onion and leeks. Cook for 3-4 minutes or until onions are translucent. Add garlic and cook for 1 minute. Transfer onion mixture to a bowl and return pan to heat.
Add remaining oil in the pan, add bacon and cook until golden, stirring occasionally. Add to the onion mixture and stir to combine. Spread over a double thick sheet of paper towel to drain.
Whisk cream, eggs and yolks in a bowl until well combined. Season with salt and pepper.
Fill the base of the cooked pastry shell with onion and bacon mixture. Scatter over half the cheese. Pour over egg mixture and sprinkle with remaining cheese. Bake for 20 minutes, or until set. Allow to cool before cutting.
Subscribe to:
Posts (Atom)
Social Icons